
Inspection checklist
Use this sauna quality inspection checklist when a sample order, showroom unit, distributor batch, or project shipment arrives. The goal is to check the visible product, the packing record, and the evidence file before the buyer signs off internally.
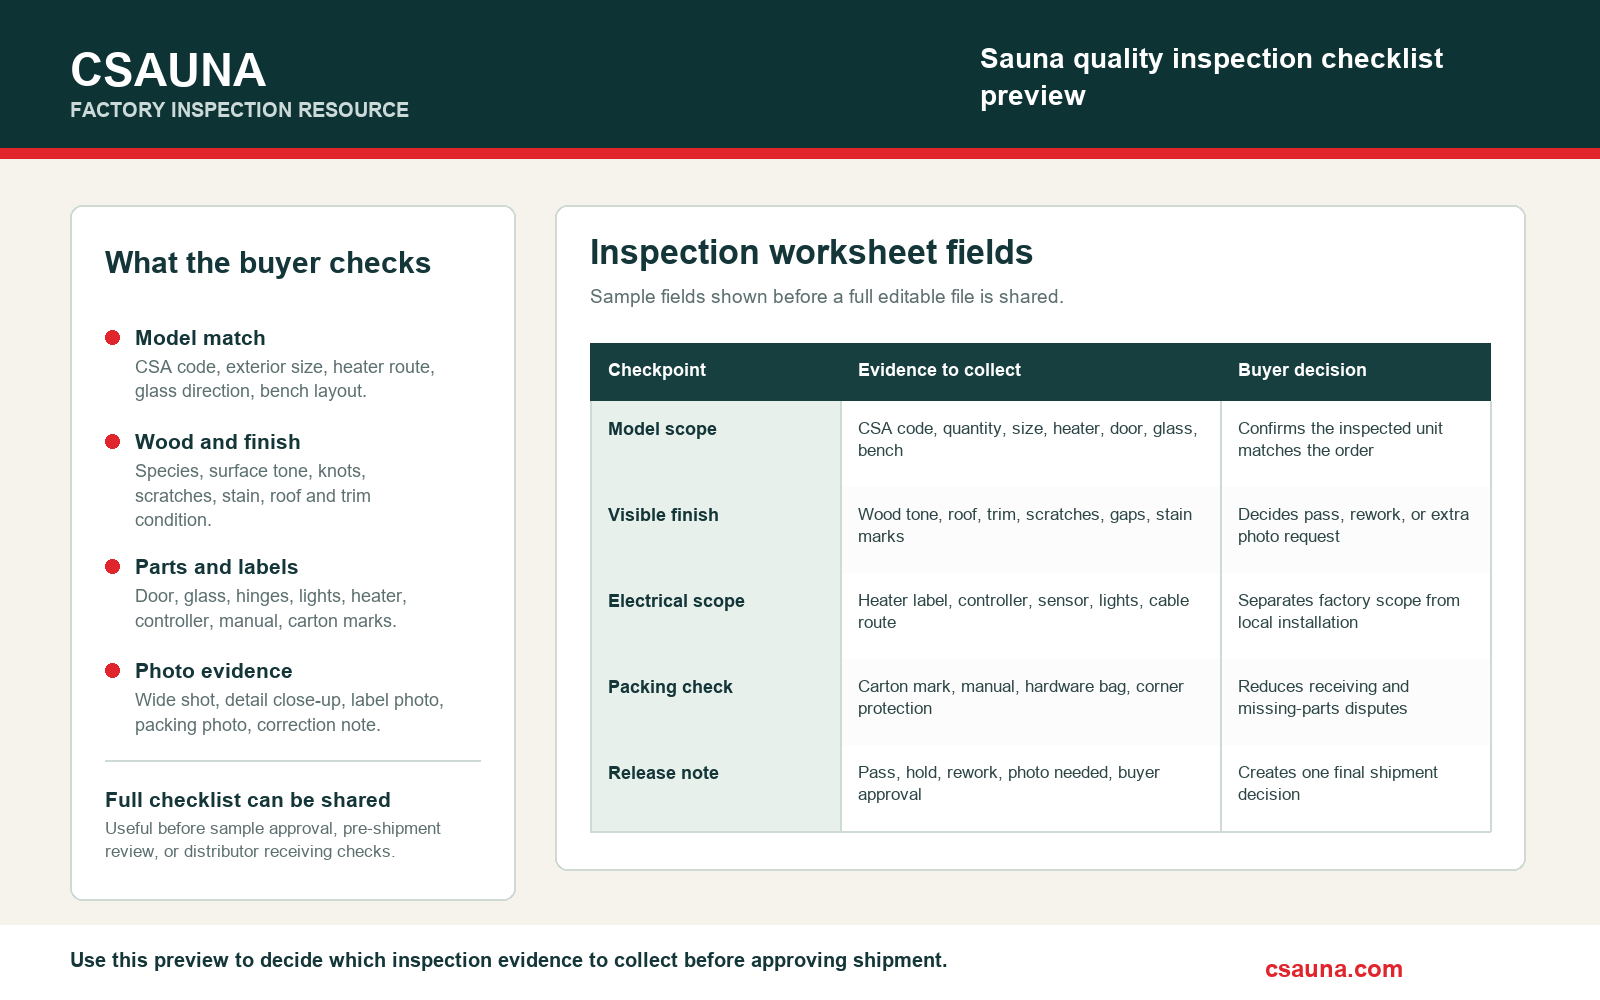
Inspection file preview
Inspect the model before shipment release.
This preview shows the inspection fields a buyer can collect before approving sample, pre-shipment, or distributor receiving checks: model match, wood and finish, electrical scope, packing evidence, and release decision. Use the UL, ETL and CE evidence guide when the electrical and market-document fields need a separate compliance review.
- Use it before sample approval, pre-shipment review, or warehouse receiving.
- Attach photos for model code, finish details, heater label, controller, packing mark, and correction notes.
- The complete editable checklist can be shared when the model list and inspection stage are known.
No quote request is required for the checklist. It is a buyer-side inspection record template.

Buyer file note: A good inspection file does not only say “passed.” It records what was checked, what photo proves it, who reviewed it, and what must be corrected before resale, installation, or project handover.
Inspection sequence before accepting a sauna shipment
Start outside the crate and move inward. Do not unpack everything randomly. Check carton marks, crate condition, accessory boxes, labels, and packing list first. Then inspect the sauna shell, door, glass, benches, heater area, controls, fasteners, and visible finish. If a problem appears, photograph it before moving parts around.
| Stage | What to check | Evidence to keep | Decision |
|---|---|---|---|
| Outer packing | Crate, carton, pallet, moisture marks, compression, missing labels, and broken corners. | Photos of all sides before opening. | Record damage before signing the warehouse file. |
| Label match | Model code, quantity, carton number, accessory box mark, and destination note. | Photo of label and packing list side by side. | Confirm the received shipment matches the order file. |
| Product shell | Wood panels, roof edge, base frame, wall alignment, door opening, and visible corner joints. | Front, side, rear, roof, and base photos. | Mark visible defects and separate production issue from transit issue. |
| Interior fit | Bench support, backrest, floor grid, heater guard, ventilation opening, and screw finish. | Interior overview and close-up details. | Confirm the room is safe to assemble or display. |
| Document pack | Manual, wiring note, heater label, certificate copy if required, spare-part list, and warranty path. | Document photo or PDF screenshot. | Confirm what is available and what still needs factory follow-up. |
Wood, finish, and structure checks
Wood inspection should be practical. Natural grain and color variation are normal, but split boards, loose panels, open joints, rough sanding, wrong material, water marks, or poor roof protection should be recorded. For outdoor models, the buyer should also check the roof surface, base contact point, door threshold, and exposed edges.
| Area | Acceptable observation | Risk signal | Follow-up question |
|---|---|---|---|
| Wood tone | Natural variation within the selected timber or finish direction. | Mixed boards that look like the wrong material or batch. | Ask whether the board mix matches the confirmed wood choice. |
| Panel joint | Panels sit evenly with no obvious loose section. | Open seam, cracked panel, missing fastener, or unstable frame. | Ask for repair method, replacement part, or production review. |
| Roof and base | Roof protection and base contact points are clear and undamaged. | Broken shingle, bent trim, moisture mark, or exposed end grain. | Confirm whether the issue is transit damage or production finish. |
| Interior surface | Sanded touch areas, stable bench, and clean interior finish. | Sharp edge, rough bench, loose support, or visible glue/mark. | Request photo evidence after correction if the sauna will be resold. |
Glass, door, bench, and heater inspection
The most expensive problems are often not the largest ones. A small door alignment issue, wrong glass direction, missing handle, heater label mismatch, or unclear control route can delay installation and create service disputes. Check these items against the model page, drawing, and final order note.
| Component | Check point | Photo angle | Why it matters |
|---|---|---|---|
| Glass | Crack, edge chip, seal, privacy direction, and panel position. | Full front plus close-up of edges. | Glass claims need clear evidence before installation. |
| Door | Opening direction, handle, hinge, latch, magnet, and threshold. | Door closed, door open, hinge close-up. | Door problems affect daily use and buyer trust quickly. |
| Bench | Support points, height, width, backrest, and load feel. | Bench side and underside photos. | Bench repairs are harder after the sauna is installed. |
| Heater area | Heater guard, cable route, label, voltage note, and clearance. | Heater position and label photo. | Electrical details must match the local review path. |
Inspection result categories
Not every finding has the same meaning. A small cosmetic mark may be accepted for a sample room, while the same mark may be unacceptable for a showroom display. A missing document may not stop unloading, but it can stop resale or project approval. Classify each finding before asking the supplier to respond.
| Status | Use when | Required action | Owner |
|---|---|---|---|
| Accept | The item matches the order file and no material concern is found. | Save photo and close the line item. | Buyer QC owner. |
| Accept with note | Minor mark or variation does not affect use, resale, or installation. | Record limitation and buyer approval. | Buyer and supplier contact. |
| Hold for reply | Issue may affect installation, documents, warranty, or resale. | Send photos, model code, carton number, and requested answer. | Supplier service or sales engineer. |
| Reject or replace | Wrong product, broken glass, unsafe part, missing major component, or severe damage. | Stop use, keep packaging evidence, and request replacement route. | Buyer manager and supplier owner. |
Inspection release workfile for buyer sign-off
A checklist is easier to use when every finding leads to a decision. Before a shipment is released, keep one workfile that shows the model code, evidence owner, defect grade, supplier answer, and closeout condition. This helps the buyer decide whether to accept, accept with a note, hold the item, request parts, or ask for a remake.
| Workfile field | What to record | Who confirms | Closeout rule |
|---|---|---|---|
| Model and carton | CSA model code, carton number, order reference, and received quantity. | Warehouse or buyer QC owner. | The line can be closed only when the item matches the packing list and product model. |
| Finding grade | Observation, minor nonconformance, functional issue, safety issue, or missing item. | Buyer QC owner, with supplier reply if action is needed. | The grade must explain whether the unit can be displayed, resold, installed, or held. |
| Photo set | Full view, close-up, label/carton photo, and one context photo showing location on the sauna. | Person taking the inspection photos. | Every open issue needs enough photo evidence for the supplier to identify the part or production step. |
| Correction path | Accept note, replacement accessory, spare part shipment, repair guidance, credit request, or remake review. | Buyer and supplier contact. | The correction path is closed after proof of the agreed action is saved in the buyer file. |
| Release decision | Release, release with note, hold for parts, hold for supplier answer, or reject for project use. | Purchasing manager or project owner. | The shipment should not move to resale or installation until the decision is recorded. |
Inspection file handoff map
| Buyer team | What they need from the inspection file | Useful CSauna reference page |
|---|---|---|
| Purchasing | Model match, defect grade, supplier answer, and whether the issue changes reorder confidence. | Product model references |
| Material review | Wood species, finish tone, roof/edge exposure, and document evidence for red cedar or hemlock when required. | Materials and accessories options |
| Warehouse | Carton count, crate condition, accessory bag, loose parts, and photo names tied to carton numbers. | Packing list before shipment |
| After-sales | Warranty scope, replacement part route, installation condition, and service follow-up notes. | Warranty terms for importers |
Practical use: The full worksheet can be kept as an internal buyer file. No RFQ is required to use the checklist; it is meant to help importers, dealers, hotels, gyms, and project buyers keep inspection decisions traceable.
Photo and document evidence checklist
Keep the inspection file simple enough that a purchasing manager, warehouse team, dealer, installer, and supplier can all understand it. Name each photo by model code, carton number, and issue type. Do not rely on chat screenshots alone.
| Evidence | What it should show | File name example | When to send |
|---|---|---|---|
| Crate photo | All sides, labels, and visible transport marks. | CSA-01-crate-01.jpg | Before unpacking if damage is visible. |
| Model photo | Full product view after unpacking. | CSA-01-front-view.jpg | When confirming received model. |
| Issue close-up | Defect with a hand, ruler, or reference point for scale. | CSA-01-glass-edge-chip.jpg | When asking for repair, credit, or replacement. |
| Document screenshot | Manual, label, certificate, packing list, or accessory list. | CSA-01-document-check.png | Before internal approval or resale. |
Container inspection defect grading worksheet
When a buyer receives several sauna models in one shipment, the inspection file should separate cosmetic notes from issues that affect resale, installation, or user safety. Use the grading table below before asking the supplier for a reply, credit, replacement, or corrective action.
| Grade | Example finding | Evidence required | Shipment decision | Closeout condition |
|---|---|---|---|---|
| Observation | Natural color variation, small wood grain difference, minor packaging dust, or removable mark. | One full view and one close-up photo with model code. | Accept and record for trend review. | Close after buyer QC owner confirms it does not affect resale or installation. |
| Minor nonconformance | Small surface scratch, missing loose accessory bag, unclear label, or document copy missing from the carton. | Photo, carton number, packing list line, and required correction. | Accept with supplier follow-up or replacement accessory. | Close after corrected document, accessory, or written confirmation is saved. |
| Major nonconformance | Wrong door direction, wrong glass layout, heater label mismatch, missing key component, or visible structural movement. | Full product view, detail photo, label, model page, drawing or order note, and warehouse record. | Hold the model from resale or installation until supplier reply is complete. | Close after repair route, replacement route, or approved concession is documented. |
| Critical / stop-use | Cracked glass, exposed wiring, repeated breaker concern, unstable bench support, severe transit damage, or water intrusion near electrical parts. | Stop-use note, photos before movement, carton/crate condition, electrician or installer note when relevant. | Do not install or hand over until safety review is complete. | Close only after qualified review, supplier technical reply, and buyer approval are recorded. |
Warehouse receiving worksheet fields
A useful sauna inspection worksheet should be simple enough for warehouse staff but detailed enough for the purchasing manager and factory engineer. These fields prevent a vague complaint from turning into a long email chain.
| Worksheet field | What to enter | Why it matters | Example |
|---|---|---|---|
| Model and carton identity | CSA model code, product URL, order reference, carton number, pallet number, and destination. | Connects the issue to the correct product page, packing list, and buyer file. | CSA-648, carton 3 of 5, dealer showroom sample, Vancouver warehouse. |
| Inspection stage | Before unloading, before unpacking, after unpacking, component check, document check, or final closeout. | Shows whether the issue came from transit, unpacking, production, or document scope. | Damage visible before opening crate; photo taken before moving pallet. |
| Finding category | Wood, finish, roof, base, glass, door, heater, controller, accessory, packing, document, or label. | Lets the supplier route the case to the right team instead of giving a general reply. | Door/hinge category, lower corner rubs after standing unit upright. |
| Severity and action | Observation, minor, major, critical; accept, hold, repair, replace, or request document. | Creates a clear commercial decision instead of a chat discussion. | Major, hold for supplier reply, replacement handle and hinge check required. |
| Evidence folder | Photo names, short video, label photo, packing list screenshot, drawing revision, and owner. | Makes the inspection reusable for warranty, reorder, and supplier scorecard review. | CSA-648-door-rub-video.mp4; CSA-648-hinge-closeup.jpg; Rev B drawing attached. |
| Supplier answer and closeout | Cause, correction, promised part/document, date, responsible person, and final acceptance note. | Prevents the same finding from staying open across sales, warehouse, and service teams. | Factory confirmed hinge adjustment guide; dealer accepted after correction photo. |
Supplier reply and inspection closeout record
The inspection is not finished when the buyer sends photos. It is finished when every finding has an owner, answer, correction route, and closeout status. For B2B orders, this record should stay with the model code and shipment file so sales, warehouse, service, and purchasing teams do not each keep a different version of the problem.
| Reply item | What the supplier should answer | Buyer closeout note | When to reopen |
|---|---|---|---|
| Cause | Whether the issue is production, packing, transit, handling, installation, or document scope. | Record the cause before deciding credit, replacement, or acceptance. | Reopen if the same issue appears on another carton or model. |
| Correction | Repair method, replacement part, revised packing, document copy, or revised instruction. | Save the promised correction with date and owner. | Reopen if the correction cannot be used by the warehouse or installer. |
| Commercial decision | Whether the item is accepted, discounted, replaced, held, or added to next order review. | Keep approval from the buyer side, not only the chat message. | Reopen if the finding affects resale, warranty, or project handover. |
| Prevention | What changes before the next shipment: label, crate, photo set, QC point, accessory count, or packing note. | Add prevention to the next purchase order or inspection checklist. | Reopen during reorder planning if the prevention step is missing. |
For repeat orders, turn the closeout record into a supplier scorecard. Track which issues were accepted, which needed replacement, which delayed resale, and which were prevented in the next shipment. This is more useful than a vague pass or fail note because it improves the next buying file.
How CSauna buyers can use this checklist
Importers, distributors, dealers, hotels, gyms, and project buyers can use this checklist before accepting a sample or container shipment. Send the model code, order reference, issue photos, carton number, destination, and the decision you need from the factory. If the team needs an editable inspection worksheet, ask for the checklist by article name and specify whether the file is for warehouse receiving, showroom acceptance, project handover, or after-sales support.